Soil Jar Test
 Soil is comprised of soil particles, organic matter, water, air and living organisms, all of which are important to the overall health of the soil and your lawn that grows in it. There are three primary soil particles, Sand, Silt and Clay and different ratios of these make up the soils texture. Texture relates to soil porosity, which refers to the pore spaces where air and water reside which results your soils ability to retain nutrients and air for your lawn
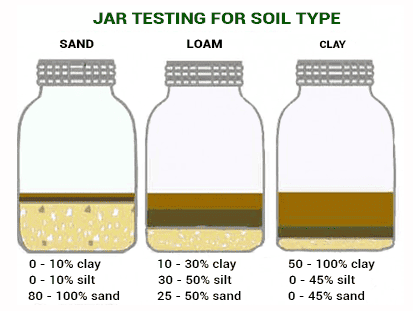
Ideally the best soil texture is a balance of the three, this is known as a loam. Normally the particle types ratios will not be balanced, the soil profile will either need to be adjusted with your top dressings, adding sand or organics and/or your cultural practices altered by compensating your application rates and frequency of fertilisers and amendments. So, we use a simple test to paint a picture of what type of soil you have. Known as a “Jar Test”, the process uses percentages to determine the level of sand, silt, and clay in your soil samples.
Materials:
- Straight edged, clear jar with lid
- Permanent marker
- Ruler
- Watch
- A squirt of dishwashing detergent
Procedure:
- From numerous areas of your lawn, it might involve use of a sharp spade to cut a section of your sod to remove a section for a sample and refit and pat the section back down. Alternatively use plugs from coring or use a makeshift corer from pipe. More samples from different areas will give you a better average of what you have. You might want to retain some of the sample for a pH test.
- Combine all the samples together, remove as much of the bulky organic matter together with other rocks and debris. Fill your Square sided jar 1/3 full of the soil
- Fill the remainder of the jar up with clean tap water, leaving approx. 10mm from the top
- Add a squirt of dishwashing detergent
- Screw the lid on and shake vigorously until the soil turns into a uniform mix.
- Place on it your table (where it can be left undisturbed for a couple of days) and time for one minute.
- Mark the outside of the jar, showing the coarse layer settled at the bottom of the jar, this the sand.
- Leave the jar for an additional 2 hours. Mark the top of the next settled layer with the permanent marker. This is the silt.
- Leave the jar undisturbed for an additional 48 hours. Mark the top of the this settled layer as before. This is the clay layer.
- With the ruler, measure and record the height of each layer, and the total height of all three layers. You can get and idea from this as to what particle dominates and guestimate with some accuracy. But to correctly classify your soil (as required for Superintendent) we should go further.
Use the soil texture analysis worksheet below to record and calculate results.
Measurements
Height of sand layer ________mm
Height of silt layer ________mm
Height of clay layer ________mm
TOTAL HEIGHT OF LAYERS ________mm
% SAND=(sand height)/(total height) x 100 =___________ % SAND
% SILT=(silt height)/(total height) x 100 =____________ % SILT
The remainder is % CLAY=100-%SILT-%SAND
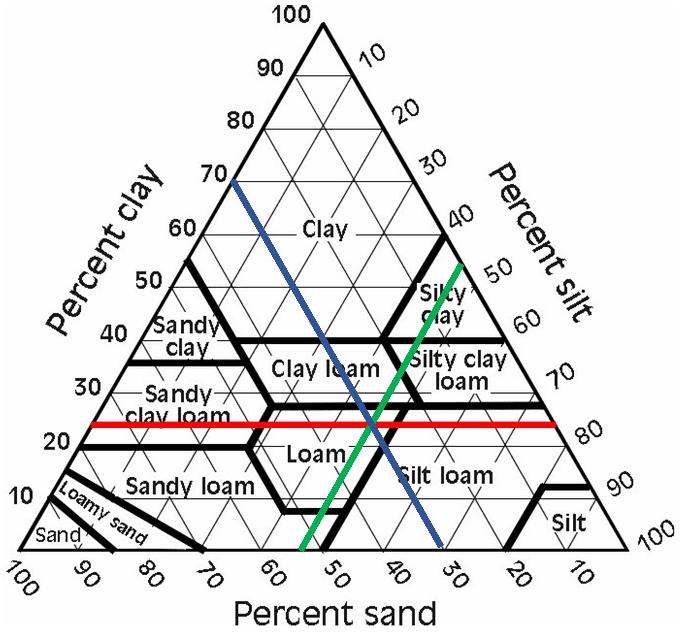
Use this soil texture triangle to estimate the soil type for the site.
Coloured lines represent an example only
- The clay percentages are listed on the left side of the triangle. Lines corresponding to clay percentages extend from the percentages reading left to right (see red line).
- The silt percentage is on the right side, with lines extending downwardly, diagonally right to left (see green line).
- The sand percentage is on the right side, with lines extending upwardly, diagonally right to left (see blue line).
- Track the lines with the percentages measured and find the spot on the triangle where all three lines intersect. The region where these lines intersect indicates the soil average soil type you have.
-
Or you can CLICK HERE to be directed to a soil calculator.